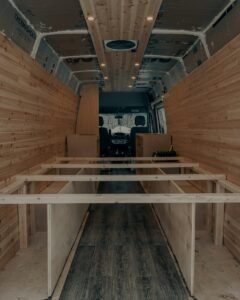
Tiny tables and counters are a common pain point for van lifers, hindering creativity and overall enjoyment of your mobile home.
But it doesn’t have to be this way! You deserve a camper van table and countertop that are as functional as they are stylish. A space that inspires you to whip up delicious food and allows you to get some work done.
The good news? Creating your dream camper van table and countertop is within reach, even for DIY beginners. In this blog post, we’ll unveil 5 easy and affordable tips to transform your van into a fully functional space, without breaking the bank.
Building a camper van table and/or countertop is a lot simpler than you think. The only materials you need is some 5/8″ plywood and maybe some dimensional lumber (if you want to get creative). Look at the counters in your home, you’ll notice that they’re very similar to cabinets except that counters are lifted a few inches above the floor (that’s where the doors usually start). With the right hardware, you can add shelves and even drawers to maximize the space. We’ll also show you how to add a sink to the kitchen countertop! So, let’s get into the step-by-step process of making your camper van functional.
Building a van table/workbench
Craving a dedicated workspace in your van but short on time and complexity? We’ll guide you through constructing a basic van table/workbench using just a few readily available materials. This simple design not only provides a workspace but also doubles as a secure storage compartment for your essential van equipment like a heater and battery!
Materials:
- Sheets of 5/8″ Plywood: Choose a size that works for your desired table dimensions and van layout.
- Screws: Select screws suitable for working with plywood (floor screws, deck screws, etc…).
- Paint and Contact Paper: Personalize your table’s look with paint or waterproof contact paper for a finished touch (optional).
Tools:
- Drill
- Saw (Circular saw or Miter saw for cleaner cuts)
- Tape measure
- Pencil
- Sandpaper (or Electric Sander)
- (For Bolting): Rivet nuts, bolts, washers
Step 1: Plan Your Layout
- Grab a piece of paper and sketch a simple box design representing your table. This helps visualize the dimensions and ensures all pieces fit together seamlessly.
- Decide on your desired height (between 3-4 feet is ideal for comfortable use as a workspace).
- Base on your sketch, determine the measurements for the table’s sides, top, and back.
Step 2: Cutting the Plywood
- Transfer your measurements to the plywood sheets using a straightedge and pencil. Double-check for accuracy!
- Using your saw, carefully cut the plywood pieces according to your markings.
Step 3: Assemble the Table
- Lay the plywood pieces flat on a work surface, with the intended tabletop facing downwards.
- Position the side pieces upright, aligning them with the designated edges of the top and back pieces.
- Pre-drill pilot holes to prevent the wood from splitting when screwed together.
- Secure the side pieces to the top and back using your wood screws.
Step 4: Adding Doors and Shelf (Optional)
- This step is optional, but offers valuable storage space and doubles as a secure compartment for your van’s essentials.
- Doors: Measure and cut two (or one large) pieces of plywood for the cabinet doors.
- Attach hinges to the door(s) and the table frame, allowing for smooth opening and closing.
- Consider adding a handle or knob for easy access.
- Shelf: Measure and cut a piece of plywood for the internal shelf. Ensure it fits comfortably within the table frame.
- Attach the shelf to the desired height using brackets or cleats. This shelf becomes a perfect hidden storage space for your portable heater or even your van’s secondary battery!
Step 5: Smoothing and Finishing Touches
- Sand all surfaces of the table thoroughly to achieve a smooth finish.
- Wipe away any dust with a damp cloth.
- Now comes the fun part – personalization!
- Paint the table to match your van’s interior for a cohesive look.
- Optional: For a realistic countertop finish, apply waterproof contact paper with a countertop pattern to the top surface.
Step 6: Secure Installation
- Position your completed table/workbench in your desired van location, considering both functionality and access to the storage space.
- Secure Mounting: Unlike simple bolting, for this project, we recommend using rivet nuts and bolts for a more secure attachment to the van walls. This ensures the table can handle the weight of your equipment and provides additional stability.
- Mark the drill holes for the rivet nuts, ensuring proper clearance for your legs or chair when using the table. Pre-drill these holes in the van wall.
- Install the rivet nuts according to the manufacturer’s instructions.
- Position the table back onto the wall, aligning the holes with the installed rivet nuts.
- Using bolts and washers, securely fasten the table to the van walls through the rivet nuts.
Congratulations! You’ve built a simple yet functional table/workbench for your camper van. This space-saving addition provides a dedicated work area, secure storage for your heater and battery, and a touch of personalization to your mobile home. Enjoy the extra functionality and comfort it brings to your van life adventures!
Building a van countertop w/ sink
The beauty of DIY van builds lies in their adaptability! With a few modifications, you can transform your basic table/workbench into a full-fledged countertop complete with a sink – perfect for washing dishes and simplifying your van kitchen setup. Here’s how to create this variation:
Materials:
- (Additional) Plywood Sheet: You’ll need one additional sheet of plywood for the countertop surface (ensure it’s slightly larger than the table top to create an overhang).
- **(Sink) Choose a compact and lightweight drop-in sink made from plastic or stainless steel.
- (Optional) Drawer Slides and Hardware: If you plan to add a silverware drawer.
Tools:
- (Jigsaw) In addition to the tools from the previous section, you’ll need a jigsaw for cutting the sink hole.
Step 1: Modifying the Table Top
- Here’s the key difference: Instead of attaching the top plywood sheet directly to the table frame, leave it unattached for now. This sheet will become your dedicated countertop.
- Optional Drawer: If you plan on adding a silverware drawer beneath the sink, determine the desired drawer size and cut the drawer front and sides from the additional plywood sheet. Assemble the drawer using pocket hole screws or wood glue and clamps.
Step 2: Creating the Sink Hole
- Carefully measure and mark the desired placement of the sink on the unattached countertop plywood sheet. Ensure proper clearance from the back wall for plumbing access (which we’ll address in a future guide).
- Using your jigsaw, meticulously cut out the sink hole according to the sink’s template or measurements.
- Tip: Drill a small pilot hole first to allow for easier maneuvering of the jigsaw blade.
Step 3: Assembling the Countertop (Optional Drawer)
- If you opted for a drawer, install the drawer slides onto the table frame at the desired height for the silverware drawer.
- Position the assembled drawer onto the slides and secure it.
- Carefully place the countertop (with the sink cutout) on top of the table frame, ensuring the drawer (if applicable) fits seamlessly within the designated space.
Step 4: Securing the Countertop
- Pre-drill pilot holes from the top of the countertop down into the table frame.
- Using screws appropriate for plywood, securely fasten the countertop to the table frame.
Step 5: Sink Installation (Future Guide)
While this guide focuses on the countertop construction, the actual sink installation involves plumbing connections. We’ll dedicate a separate guide to address the plumbing aspects of installing your sink and water system.
Step 6: Fresh & Grey Water Considerations
- Here’s where your table/countertop truly transforms into a mini-kitchen hub!
- Designate separate compartments within the table frame (beneath the countertop) for housing your fresh and grey water containers.
- Ensure the containers are secured properly to prevent them from shifting while driving.
- You can use straps, bungee cords, or build a simple frame within the table for added stability.
Step 7: Finishing Touches
- Sand all surfaces for a smooth finish.
- Personalize your countertop! Paint it or apply waterproof contact paper for a finished look that complements your van’s interior.
Congratulations! You’ve built a functional countertop with a sink, transforming your basic table/workbench into a versatile kitchen essential for your van. This design not only provides workspace but also incorporates storage for your fresh and grey water, making the most of your van’s limited space. Enjoy the convenience and efficiency this addition brings to your mobile culinary adventures!
Installing a swivel table
Looking to add even more functionality to your van layout? Consider incorporating a swivel table! While you can build your own using sturdy wooden components and a swivel mechanism, a simpler option is to purchase a pre-made swivel table base from online retailers like Amazon. These typically come in various sizes and weight capacities to suit your needs.
Imagine having a dedicated table surface connected to your existing L-bench or couch that can swivel effortlessly. This creates a versatile space that transforms for different purposes throughout the day. In its locked position, it serves as a comfortable dining table. With a simple swivel, it becomes a dedicated workspace for your laptop or a convenient spot to enjoy a cup of coffee while taking in the view.
The beauty of a swivel table lies in its adaptability. Mount it to the floor near your seating area, ensuring proper clearance for chairs or stools when in use. This space-saving solution optimizes your van’s layout and provides incredible flexibility for your mobile lifestyle.
Summary
This week, we empowered you to become a DIY van furniture master! We tackled two essential projects:
- Simple and Sturdy Table/Workbench: This versatile piece provides a dedicated workspace, optional storage, and even a hidden compartment for your heater and portable battery.
- Countertop with Sink Cutout (Plumbing addressed in a future guide): Transform your table/workbench into a mini-kitchen hub with a designated spot for your sink. This variation also incorporates storage for your fresh and grey water containers.
Both projects highlight the beauty of customization, allowing you to personalize the size, style, and storage options to perfectly suit your van’s layout and your needs.
Feeling inspired? Don’t miss out on:
- Week 5: Van Bed and Garage: Learn how to build a comfortable sleeping space and a functional storage area underneath!
- Week 7 (Coming Soon): Van Partition Wall: Discover how to create separate living areas within your van for added privacy and functionality.
Join the DIY Camper Van Community!
Become part of a passionate community of DIY vanlifers sharing tips, tricks, and inspiration. Head over to our online forum and connect with fellow adventurers crafting their dream mobile homes!


