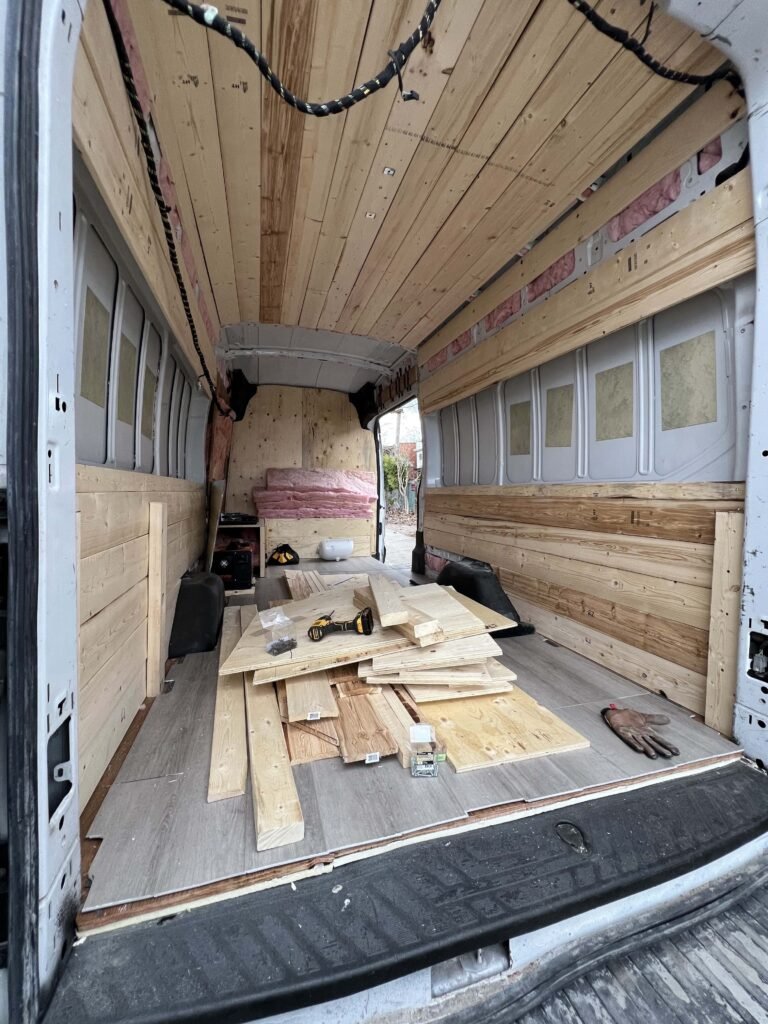
Let’s face it, that DIY van conversion dream can turn into a nightmare real quick if your walls are flimsy and your framing sounds like a haunted house. Leaks, creaks, and constant frustration – not exactly the recipe for an epic adventure, right?
This guide is your antidote to conquering van walls and framing like a seasoned pro. Imagine the satisfaction of creating a beautiful, livable space that reflects your unique style. This guide isn’t just about avoiding van-conversion woes – it’s about building the foundation for countless adventures, with confidence and pride behind the wheel.
You might be thinking of using your van’s factory holes and inserting rivet nuts for the walls and framing… I thought the same, but I urge you to avoid the trouble because as I found out, it’s NOT worth the hassle (or dealing with “spin-outs”). The best way to frame a van and build the walls is to use treated 1x4s and to secure them using self-drilling metal screws. It’ll make your life SO much simpler, give you much more control and if you’re worried about rust, you can coat your screws with silicone. So, let’s get your van walls up and build a solid frame that’ll last you a lifetime.
Strategic and lightweight van wall framing
Step 1: Planning for Minimalist Framing
The key to a lightweight and efficient van frame lies in strategic placement. Unlike building a house, where studs are spaced at regular intervals, we’ll focus on creating a framework that supports your specific furniture and maximizes usable space.
Planning Essentials:
- Gather blueprints or detailed measurements of your planned cabinets, benches, and other furniture. Mark their locations on the van walls.
- Identify areas that will support heavier items like cabinets and consider reinforcing those sections with additional framing.
- Aim to use the least amount of framing possible while maintaining structural integrity. Every stud adds weight, so prioritize strategic placement based on furniture needs.
Step 2: Tailoring the Frame to Your Furniture
Think Outside the 16-Inch Box:
Ditch the traditional 16-inch spacing mentality. Instead, use your furniture plans as a guide. Here’s how:
- Cabinet Locations: At the planned mounting points for cabinets and heavy furniture, install vertical studs directly behind them to provide a solid backing for future screws. Space these studs according to the cabinet’s width for optimal support.
- Countertop Support: Plan horizontal studs along the wall where countertops will be installed. These will provide a secure base for the countertop and its weight.
- Open Space Optimization: For areas without furniture, consider using fewer studs or even eliminating them altogether. Utilize lightweight wall panels or insulation with a backing material suitable for hanging lighter items.
Step 3: Securing the Frame with Smart Choices
Now that you have a strategic framing plan, it’s time for the build:
- Treated 1x4s: Stick with high-quality treated lumber for your studs, ensuring they’re straight and free of warping.
- Self-Drilling Metal Screws and Silicone: Invest in high-quality, self-drilling metal screws with a silicone coating to prevent rust.
Pro Tip: When attaching the studs, consider using construction adhesive along with the screws for extra holding power, especially for areas with heavier furniture loads.
Step 4: Verifying Levelness and Making Adjustments
Just like in the previous section, ensure everything is level and plumb. Use a level to check both horizontal and vertical alignment of your studs. Make any necessary adjustments before moving forward.
By taking this strategic approach to framing, you’ll create a strong and supportive foundation for your van’s interior while minimizing unnecessary weight and maximizing valuable space. Remember, the key is to plan your furniture placement beforehand and use the studs strategically to support those specific needs.

Optimizing space in your camper van with inset walls
Before tackling the finishing touches on your van walls, let’s focus on maximizing your precious living space by creating “inset walls” around specific areas like windows and especially your future bed platform. These insets are essentially framed sections that recess slightly from the main wall, creating additional usable space without sacrificing overall interior volume.
Benefits of Inset Walls:
- Extra Headroom and Elbow Room: Inset walls, particularly around the bed platform, can provide valuable headroom and prevent feeling claustrophobic in your van.
- Maximized Storage Potential: The recessed area created by the insets can be utilized for additional storage compartments or cubbies, ideal for smaller items.
- Streamlined Look: Inset walls can add a touch of visual interest and a more finished look to your van’s interior.
Material Selection:
- 1x4s or 1x6s: For these insets, you can choose either 1x4s or 1x6s treated lumber.
- 1x4s: This option offers a space-saving approach, creating a smaller inset but still providing some additional depth.
- 1x6s: If maximizing space around your bed platform is a priority, opt for 1x6s. This will create a more noticeable inset, offering more room for storage or increased headroom.
Step 1: Planning and Measurements
- Identify Key Areas: Determine the areas where you want to create inset walls. This typically includes windows and your designated bed platform location.
- Depth Decision: Based on your chosen lumber (1x4s or 1x6s) and desired space optimization, decide on the depth of the inset for each area.
- Meticulous Measurements: For each planned inset wall, meticulously measure the length, height, and depth, taking into account any curves or cutouts around windows or existing structures.
Step 2: Cutting the Lumber
- High-Quality Lumber: Use high-quality treated lumber (1x4s or 1x6s) for the inset framing. Ensure the boards are straight and free of warping.
- Marking and Cutting: Transfer your measurements to the lumber using a straight edge and pencil. Utilize a miter saw for precise cuts, especially for corners.
Step 3: Building the Inset Frame
- Assemble the Frame: On a flat surface, assemble the frame for each inset wall using your cut lumber. Use a combination of screws and construction adhesive to create a strong and secure structure.
- Double-Check Measurements: Before attaching the frame to the van wall, double-check all measurements and ensure the inset sits level and plumb.
Step 4: Attaching the Inset Frame
- Strategic Placement: Position the completed inset frame against the van wall, aligning it with your pre-determined layout.
- Fastener Frenzy: Secure the frame to the existing wall studs or directly to the van’s metal frame using screws with proper spacing. Ensure a secure connection for a sturdy structure.
Step 5: Optional – Insulation and Backing Material
- Climate Control: Consider adding insulation material within the inset wall cavity for added temperature regulation, especially if the inset is located near a window.
- Backing Material: Once the inset frame is secured, choose a suitable backing material like thin plywood or lightweight paneling to enclose the back of the inset. This will create a finished look and provide a surface for additional storage solutions.
By creating these smart inset walls, you’ll optimize the usable space within your van, maximize storage potential, and enhance the overall aesthetic of your interior. Remember, the key is to plan your measurements carefully and choose the lumber size (1x4s or 1x6s) based on your specific space needs.
Finishing your van walls with 1x4s
We’ve built the foundation with strategic framing, and now it’s time to create a finished look for the exposed areas of your van walls. Remember, we’ll be focusing on 1x4s for sections not covered by furniture.
Step 1: Identifying Exposed Areas
With your furniture securely mounted, assess the remaining exposed sections of the van walls. These are the areas that will be covered with your 1x4s.
Step 2: Planning and Measuring
- Sketching a Layout (Optional): Consider sketching a layout on paper to visualize the placement of the 1x4s and minimize wasted material.
- Meticulous Measurements: For each exposed area, meticulously measure the length and height, taking into account any curves or cutouts needed for windows, doors, or furniture.
Step 3: Selecting and Cutting 1x4s
- Material Choice: Opt for high-quality treated 1x4s to ensure durability. Choose a size and thickness that complements your overall design.
- Marking and Cutting: Transfer your measurements to the 1x4s using a straight edge and a pencil. Utilize a miter saw for precise cuts, especially for corners.
Pro Tip: If some of your cuts are short scraps leftover from framing, consider incorporating them into the design to minimize waste.
Step 4: Attaching the 1x4s
- Strategic Placement: Begin by attaching the 1x4s to the exposed sections of the wall, following your planned layout.
- Fastener Frenzy: Secure the 1x4s to the underlying studs or directly to the van’s metal frame where there are no studs. Utilize screws or staples (or a combination) with proper spacing for a clean look.
Pro Tip 2: Pre-drill pilot holes in the 1x4s before attaching them to prevent splitting and ensure a smooth installation.
Step 5: Finishing Touches
- Sanding and Staining: Once all the 1x4s are secured, sand down any rough edges for a smooth finish. Apply a coat of stain or paint to match your desired aesthetic.
- Decorative Touches (Optional): Consider adding decorative trim or molding along the edges of the 1x4s for an extra touch of style.
By following these steps, you’ll create a finished look for the exposed sections of your van walls using a strategic and lightweight approach with 1x4s. This method complements your furniture placement, minimizes unnecessary weight, and maximizes usable space in your van conversion.
When to use rivet nuts
While strategic framing with 1x4s forms the foundation for your van walls, there are situations where additional reinforcement might be necessary. This is where rivet nuts come in – these handy threaded inserts provide a strong and secure way to attach heavy furniture, support structures like mezzanine beds, and even create anchor points for cargo or safety features.
Benefits of Rivet Nuts:
- Strength and Security: Rivet nuts offer a reliable and high-strength connection for attaching heavy objects to the van’s metal frame.
- Accessibility from the Inside: Unlike welding nuts, rivet nuts can be installed entirely from inside the van, making them ideal for confined spaces.
- Versatility: Rivet nut size and material can be chosen to accommodate a variety of bolt sizes, allowing you to customize the support for different applications.
Important Planning:
Before diving into the installation process, some planning is crucial to ensure optimal placement and functionality:
- Identify Reinforcement Needs: Assess which elements in your van build require extra support, such as mezzanine beds, heavy cabinets, or seat belt mounting points. (Important Disclaimer: Always consult a qualified professional for seat belt installation to ensure compliance with safety regulations.)
- Framing Considerations: While strategic framing provides a solid base, consider incorporating additional studs or backing plates near planned rivet nut locations for optimal support, especially for high-stress applications.
- Utilizing Existing Holes: Look for pre-existing holes in the van’s metal frame. These factory holes can often be repurposed for rivet nut installation, eliminating the need for drilling.
- Accessibility and Spacing: Plan the placement of rivet nuts with accessibility in mind. Ensure you can comfortably insert the rivet nut and tighten the bolts from inside the van. Maintain proper spacing between rivet nuts to distribute weight evenly.
Installation Tips:
- Choosing the Right Rivet Nut: Select 1/4″ diameter rivet nuts made from a high-strength material like steel. Ensure the length is appropriate for the thickness of your van wall.
- Matching Rivet Nut and Bolt Size: Use 1/4″ diameter bolts to match the size of your chosen rivet nuts.
- Alignment Trick: Here’s a handy trick to align the rivet nut with the corresponding spot on your wooden stud: Insert the bolt into the installed rivet nut, apply some ink or marker to the tip of the bolt, and press the bolt against the stud. The ink will transfer, marking the exact location where you need to drill a hole in the stud to accommodate the bolt.
- Drilling Holes in Studs: Using the alignment marks, drill pilot holes in the wooden studs to match the diameter of your bolts.
Applications for Rivet Nuts in Your Van:
Here are some specific examples of how you can leverage rivet nuts in your van build:
- Mezzanine Bed Supports: Install rivet nuts in existing holes within the van’s metal frame to securely fasten the vertical supports for your mezzanine bed, ensuring a stable and weight-bearing structure.
- Heavy Cabinets: For particularly heavy cabinets, utilize rivet nuts and corresponding bolts to provide additional support beyond just attaching them to the framing.
- Cargo Hooks and Tie-Down Points: Create secure anchor points for cargo straps or hanging hooks by installing rivet nuts in strategic locations with existing holes.
By strategically incorporating rivet nuts alongside your framing plan, you can create a safe, secure, and functional living space in your van. Remember, planning the placement of rivet nuts in advance and utilizing existing holes will ensure they provide optimal reinforcement for the specific needs of your van conversion.
Summary
Forget flimsy walls and nerve-wracking rattles! This guide empowers you to build a solid and secure foundation for your van conversion, ensuring a smooth ride and countless adventures ahead. We’ll ditch the conventional route and focus on strategic framing – a method that maximizes space while providing the support you need for furniture and other necessities.
Step-by-Step to Sturdy Success:
- Planning is Key: Sketch your layout, identify furniture placement, and determine stud spacing based on your needs.
- Strategic Framing: Skip the 16-inch rule! Use treated 1x4s to create a frame that directly supports your furniture, optimizing space and minimizing weight.
- Silicone-Coated Screws: Invest in high-quality screws with a silicone coating to prevent rust and ensure a secure connection between the frame and the van’s metal body.
- Level Up: Ensure everything is plumb and level for a polished look and proper functionality.
Building Smart Inset Walls (Optional):
- Maximize space and create a touch of visual interest with inset walls around windows and your designated bed platform.
- Choose 1x4s or 1x6s for the inset frame, depending on your desired depth and available space.
Riveting Reinforcements:
While strategic framing provides a strong base, rivet nuts offer an extra layer of security for heavy furniture, mezzanine beds, and crucial elements like seat belts (**always consult a professional for seat belt installation!). Utilize existing holes in the van’s metal frame for a simpler installation process.
Conquer Every Step of Your Van Build Journey:
- Stay tuned for next week’s post where we’ll delve into the creation of your comfy sleeping quarters and a functional garage space (Week 5: Van Bed and Garage).
- Haven’t checked out Week 3 yet? Don’t miss out on essential tips for building a solid foundation – Week 3: Van Floor and Ceiling.
- Want to share your van conversion journey and learn from fellow DIY enthusiasts? Register for our DIY Camper Build Community and connect with a passionate community today!


